You can manually set the hex path for any of your fleets, whether they are ones your 2IC generated for missions, or ones you created yourself for your own missions.
To edit the movement path, you need to be looking at the theatre map. (See accessing the theatre map).
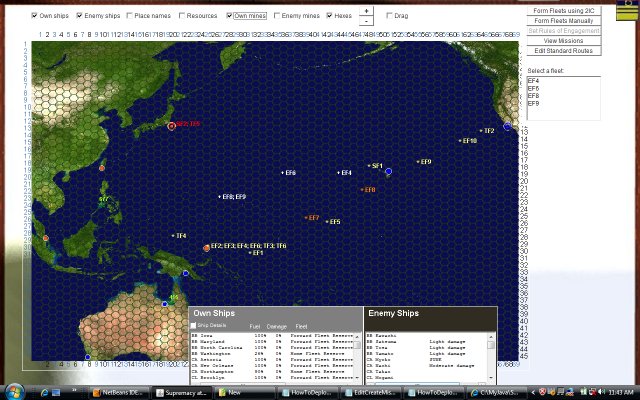
The theatre map will look something like this, depending on the theatre you are playing in:
To set the movement path, follow these steps:
These steps are explained below.
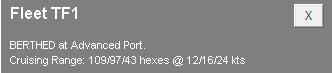
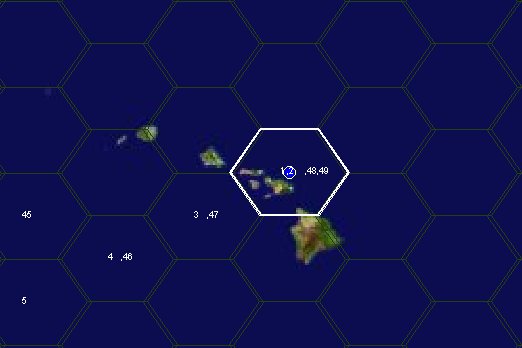
Fleet selection for all purposes in the theatre map is done using the "Select a fleet" list at the right side of the map. For illustration, shown here is the selection of fleet TF1 - with two BBs, two carriers a cruiser and several destroyers at Pearl Harbour. The fleet details box at the lower left of the screen gives details of the fleet and points to its current location:
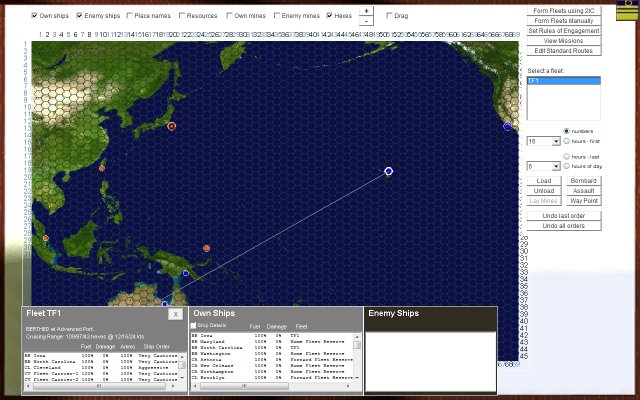
In the following steps, we are going to manually create an offensive patrol for the fleet that will take it on a wide arc west of Pearl Harbour, returning to Pear Harbour for refuelling.
By default, the map is ready for data entry, i.e., when you click in the map, the hex path will be added to.
But often it will be handy to first zoom in or out and drag the map so that you can better see the area you are interested in. The zoom and drag feature is explained in map view but in summary, after zooming in or out, the mouse becomes a hand to drag the map instead of a pointer for entering hexes. A checkbox at the top of the screen indicates whether you are in "Drag" mode:

If so, uncheck the check box. You are now ready for data entry.
For illustration here, the map in which hexes will be entered has been zoomed in a little so that the hexes show more clearly:
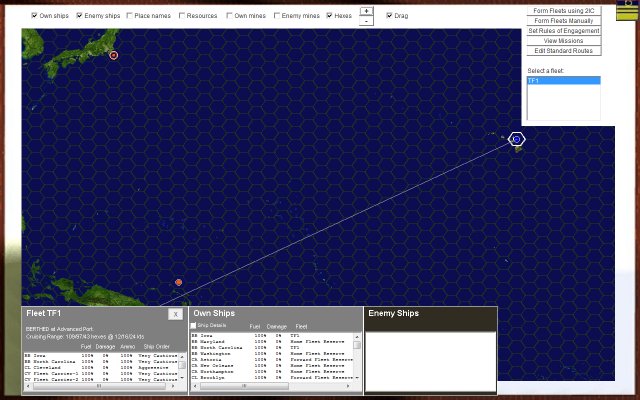
You can disable hexes in the theatre map, which gives a less cluttered view and is prettier, but for data enry it is strongly recommended that hexes are enabled. There is a "Hexes" check box at the top of the screen. If this is unchecked, make sure it is checked before you proceed further:

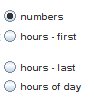
The hex path for a fleet can be displayed in any of four modes. These modes are selectable using the radio buttons at the right of the map:
Each mode provides a useful perspective that can help your planning.
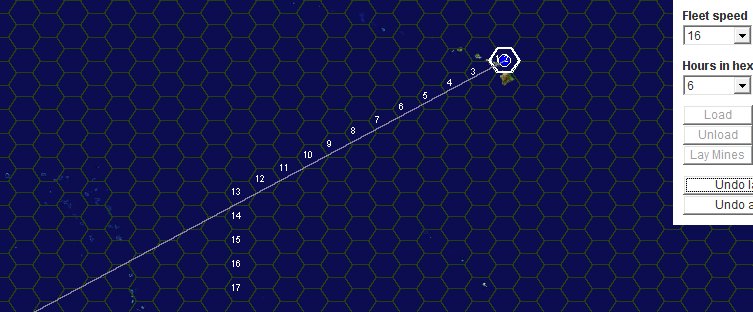
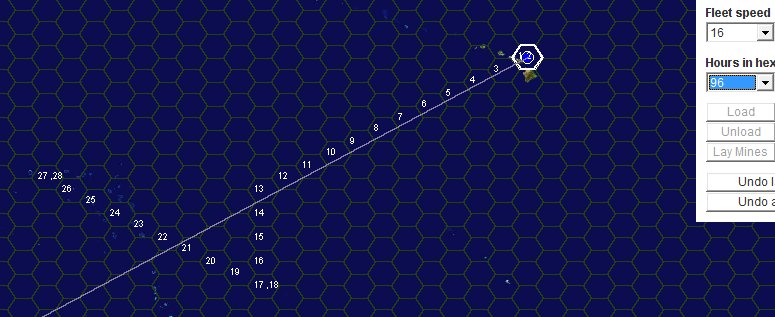
The default mode is "numbers". In this mode. hexes are numbered in the order in which they are to be travelled through. This shows clearly the route order, but also tells you quickly how many hexes the feet is to sail through - which is important to cross check against the fleet crusing range data in the fleet details box at the bottom left of the screen:
The "hours - first" and "hours - last" modes are used for fine planning, when it may be important to know the exact hour that the fleet will first enter a hex or when it is due to exit. Also, toggling between these modes tells you clearly how many hours the fleet is scheduled to stay in a hex. Finally, for the power user, these two modes let you coordinate the actions of several fleets. For example, you may want two separate fleets to converge on an area at much the same time. You can delay or accelerate either fleet to achieve this - see select a cruising speed and select the hours per hex for more information).
The "hours of day" mode is very useful for quickly seeing what time of day it will be when the fleet is entering each hex. You can use this information to better plan approaches to enemy territory to maximise the darkness of night.
For illustration here, the default ("numbers") mode will be used.
There are five standard cruising speeds: 6, 8, 12, 16 and 24 knots. A fleet though is limited to the maximum cruising speed of the slowest ship in the fleet, so not all these options may be available.
Those speeds that are available for your chosen fleet are selectable in the "Fleet Speed" combo on the right hand side of the map:

Simply choose one of the speeds, and this will apply until you choose another one. You can change the fleet speed any number of times during the course of setting a fleet's movement path. The choice of fleet speed applies to every hex until a new speed is chosen.
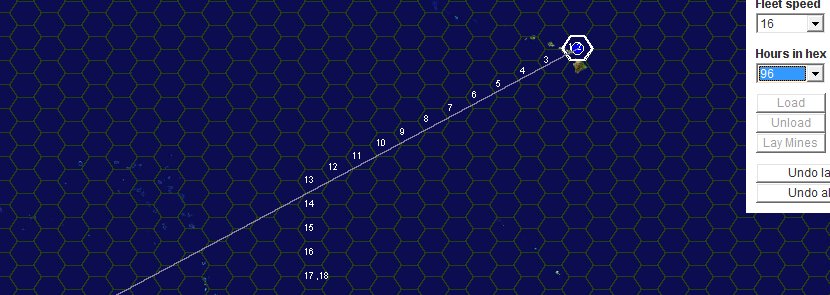
As well as setting the fleet speed, you can also set the number of hours per hex that the fleet will spend as it moves. The minimum number of hours is always the hex size divided by the fleet speed. For example, in the Pacific theatre, where the map hexes are 96 nautical miles across, the minimum number of hours for a fleet cruising at 16 knots would be 6 hours. The computer prevents you from selecting less than that. But you can set more than this. Typically, you would do this for special hexes, such as hexes where you wanted the fleet to carry out extensive patrols. When your 2IC creates patrol missions, he will in fact try to maximise the time the fleet can spend in each of its objective hexes.
The "Hours in Hex" selector is also on the right hand side of the map, beneath the fleet speed selector:

The selection of hours per hex applies to every hex until a new value is chosen.
Now you are ready to set the actual movement path.
When you click in the map on a valid hex, the computer calculates the path to it from where the fleet last was. This is unnecesary when the hexes selected are all adjacent to the previous hex; but it is much quicker to just select key hexes and let the computer calculate the path in between.
The computer will generally choose the shortest valid path. (But instead it will choose a "standard route" if you have created one between the points concerned (See setting standard routes for how to do this).
All land hexes are invalid. Enemy port hexes are also invalid - you can not move into a hex containing an enemy port. It must be captured first by amphibious assault.
All other hexes are valid.
Note that whenever you click on a hex containing one of your own ports, the fleet hex path will take it into the port itself and include the order to berth it, so that the ships may refuel, rearm and so on (provided the port has enough resources).
Then, when you click away from the port hex, the movement path will automatically include the command to unberth.
Berthing and unverthing both add a small amount of extra time to the fleet's movement schedule (a standard 12 hours in each case).
Hexes are quite large - in the Pacific for example, they are 96 nautical miles across and certainly bigger than the size of any port.
If for some reason you want to pass through a hex containing one of your own ports but not berth inside the port, click on the port hex as you normally would. Then click the "Undo last order" button. This will remove the additional berthing order that the computer has just automatically added. Effectively, this means that the fleet has been orderd into the hex where the port is but is cruising past.
Now it is tme to put this together and show a working example.
In the illustration below, the route that is shown was created following these steps:
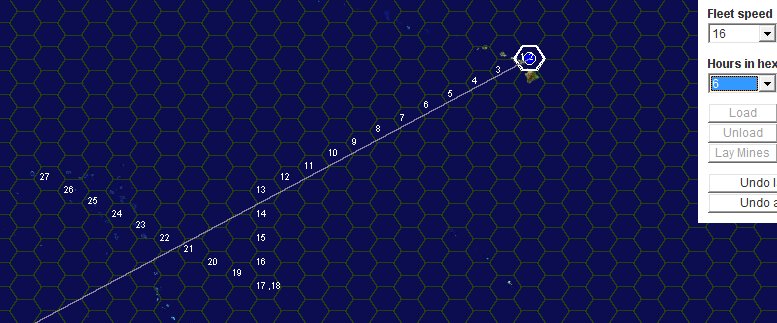
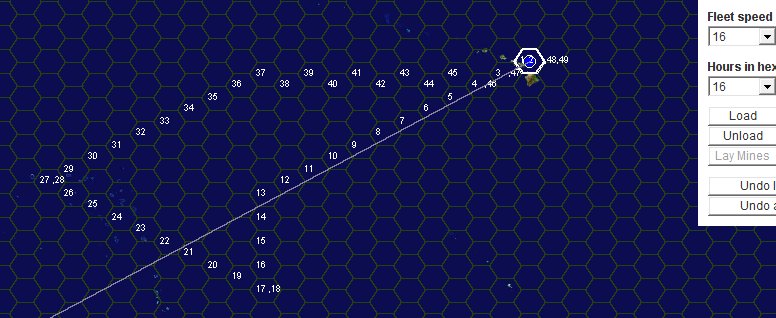
This example shows that fleet movement orders can be set up in a few mouse clicks. For finer control of the route, you can select more way points, forcing the computer to follow more exactly the route you wanted. (You can even click on every single hex if you want to!).
Another way of controlling the route without clicking on too many hexes is by setting standard routes - see set standard routes.
If you change your mind at any stage, you can undo the hex path, hex by hex or in toto.
To undo (remove) the last hex from the path, click on the "Undo last order" button on the right side of the map:

Each time you click, the last hex will be removed.
To remove ALL hexes from the fleet movement path, click on the "Undo all orders" button:

Be warned though that these undo operations can not themselves be undone, other than by recreating the movement path. So be careful before you click the "Undo all orders" button.
In any mission, you can set one or more way points.
A waypoint is a designated hex that the fleet must try to return to if at all possible, if it deviates from the scheduled route for any emergency reason at run time.
To designate a hex as a waypoint, simply click on the "Way Point" button at the right of the map:

This designates the most recently entered hex in the hex path as a waypoint. You can set any hex or hexes to be a waypoint. This can be a useful means to - for example - force your fleets to return to designated patrol hexes after any emergency tactical maneuvers.
By default, key hexes in certain missions are automatically also waypoints. These are explained below.
In manually created missions, you need to tell the fleet where to lay mines. You do this by clicking on the
"Lay Mines" button at the right side of the map just after entering a hex for the fleet to move to:

Note that fleets can often only lay mines in a single hex before needing to return to port to rearm.
Note also that the "Lay Mines" button will be disabled if the fleet is not capable of laying mines. (Only escort ships can lay mines). And the fleet must have a current cruising speed of 12 knots or less.
A hex designated as a minelaying hex is automatically also a waypoint - you do not have to separately designate it as one.
A final note on minelaying - because fleets need to frequently return to port to rearm, it can become tedious setting up minelaying missions. This is one case where using your 2IC to create these missions makes sense in almost all cases. You can still set the minelaying hexes by setting the objective hexes. (See setting mission objectives).
A bombardment mission is one where surface forces attack an enemy port from an adjacent sea hex. The adjacent hex becomes the bombardment hex.
Note that the concept of bombarding from an adjacent hex takes a small liberty with reality, because even large battleship guns had a maximum range of 40km or so - certainly less than the size of hexes in the Pacific and Atlantic. But it is necessary to bombard from an adjacent hex, not the port hex itself because of the hard and fast rule that you can never enter a hex containing an enemy port. (It must be captured first). It can be assumed that when your fleet is bombarding, it is doing so from the outer edge of the adjacent hex, and the port extends to or close to the outer edge of the port hex in the direction where the bombarding is coming from.
To indicate a suitable adjacent hex to the enemy port as the hex to bombard from, select the hex to create a path to it, and then click on the "Bombard" button on the right side of the map:

The bombard hex is automatically a waypoint.
A combined Ops mission is one where surface forces, with or withour carrier air support but always including at least some convoyed troops, attempt an amphibious assault on an enemy port. The fleet automatically bombards the port at the same time - in effect an assault operation is also a bombardment mission. Just like a bombardment mission, your forces attack from an adjacent sea hex.
To indicate a suitable adjacent hex to the enemy port as the hex to assault from, select the hex to create a path to it, and then click on the "Assault" button on the right side of the map:

The assault hex is automatically a waypoint.
An aerial bombardment mission is identical to a bombardment mission except that because the bombardment is to be done by aircraft, from carriers in the fleet, the hex from which the bombardment is launched can be further from the enemy port than an adjacent hex.
To indicate a suitable hex in aerial attack range of the enemy port as the hex to bombard from, select the hex to create a path to it, and then click on the "Bombard" button on the right side of the map:
The bombard hex is automatically a waypoint.
There are three kinds of cargo that ships can carry: raw materials, finished war materiel, and troops.
All ships can carry cargo. Obviously, merchant ships have the biggest capacity, but do not forget that your warships (except for all but very large submarines) can be useful carriers of cargo, especially troops.
Setting up a load and unload orders for a cargo mission (convoy or just warships) is a bit involved and is covered in a separate help page: see Ordering the loading and unloading of cargo.
Sometimes, you may not like the computer's choice of the shortest route between points. When manually creating a movement path, you can overcome this by setting more points, thereby more closely defining the route. But the problem remains for all missions that your 2IC sets up - here the computer will use its shortest path algorithm.
To override the computer - for manual as well as for 2IC-generated fleet paths - you can set any number of "standard routes".
Your fleets will then use a standard route whenever they can.
The most common use of standard routes is to set a safe convoy route between ports. It may be longer than the shortest path, but it can go around areas deemed unsafe, such as areas too close to enemy airfields and naval bases.
In the following example, we will see how a standard route can help keep US-Australian convoys safer.
First, we will see how a convoy from Pearl Harbour to Brisbane would be routed by the shortest path algorithm. Here, we have simply taken the convoy CF1 on to Brisbane from Pearl, by clicking on the port of Brisbane:
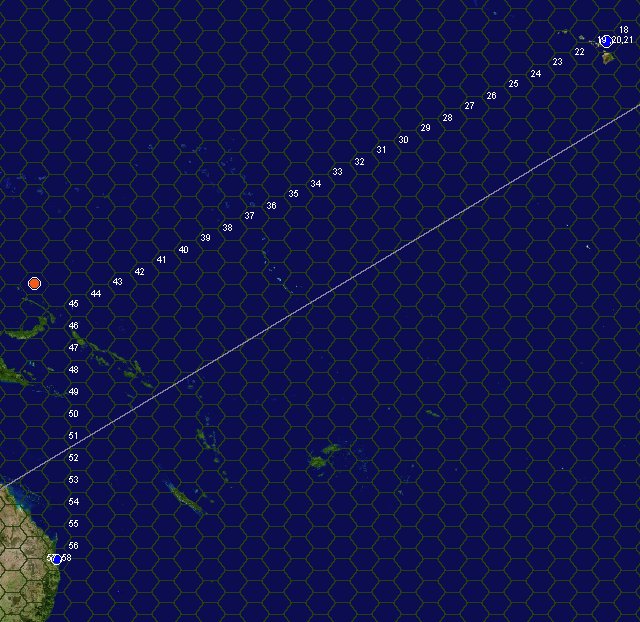
You can see that the shortest path takes the convoy within 2 hexes (about 200 nautical miles) of the enemy base at Rabaul - well within attack range by land-based aircraft, and dangerously close also to likely enemy naval units stationed there.
Now we will create an alternate, safer route that will be used by all fleets sailing between these points. It will sail much more to the south and east of Rabaul.
To activate the shortest path editor, click on the "Edit Standard Routes" button on the right side of the map:

If the "Drag" checkbox at the top of the map is checked, uncheck it, to enable data entry in the map.
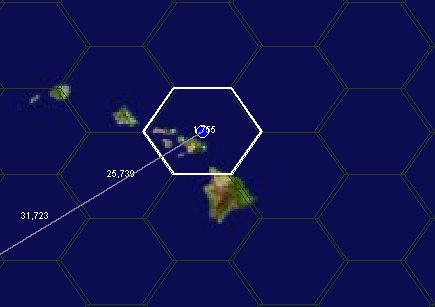
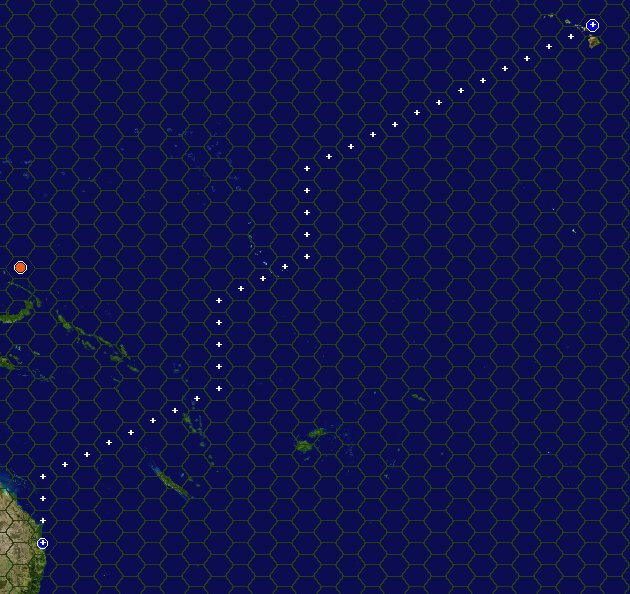
Now, define a standard route by clicking in the map. The first time you click, the hex will be the starting point of the route. Each time you click, the computer calculates the shortest path to the hex you have selected - just as it does when you are creating an actual movement path for a selected fleet. To define a route more like the one we want, several intermediate hexes have been clicked, with the last hex being the port of Brisbane. You can see the standard route now marked as follows:
To clear ths route to start again, if you do not like it, click on the "Clear this Route" button on the right side of the map:
![]()
To save this route for use by all of your fleets sailing between directly between Pearl Harbour and Brisbane, click on the "Save Route" button on the right side of the map:

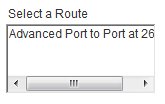
Here, we will save, this by clicking on the button. You will now see the route listed as a saved route in
You will now see the route saved in a list of routes on the right side of the map:
Now, by undoing the fleet path earlier created all the way back to Pearl Harbour, and clicking on Brisbane again, you will see that this time the computer has selected your saved standard route in preference to its shortest path calculation:
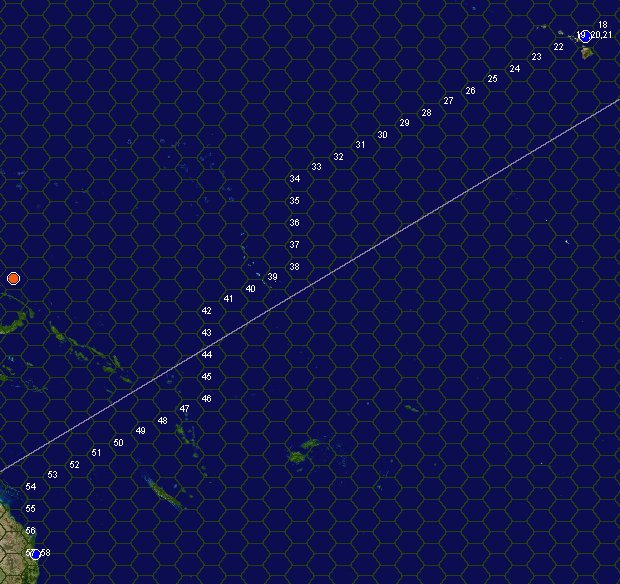
This new route is obviously much safer, and almost as importantly, it is no longer: you can see from the hex numbers that the length of the path is the same as the previous one. This highlights an important fact: the computer's choice of shortest path is governed by an algorithm (a version of the Dijkstra algorithm). This always finds the shortest path, but it is not guaranteed to find the path you most like if there are two or more that are equally short.
You can delete any standard route you have defined: just select it in the list of standard routes and click on the &Clear this route" button:
![]()
To delete all current standard routes, click on the "Clear all Routes" button:
![]()
Note that deleting a route does not affect the movement path already set for any fleets that have used it. The deletion only has effect prospectively.