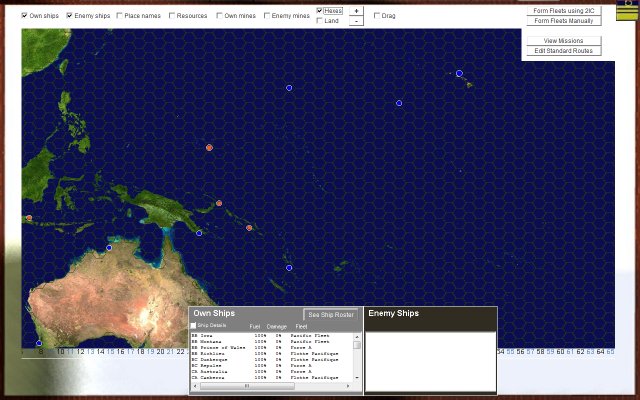
The large scale theatre map - which occupies a full screen - gives you quick access to important information, as well as to controls for manually setting up fleets and missions.
The controls for setting up fleets and missions are all on the right hand side of the screen. Their use is fully explained in how to edit or create missions.
Here, use of the map view for informational purposes is explained.
You access the theatre map by clicking on the wall map in the Admiral's Office.
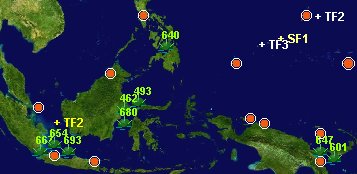
The picture below is of the theatre map for the Pacific, and is taken from a sample scenario:
The actual map you see will of course be a map of the geographic theatre for the campaign you are playing, and the details will reflect the current state of game play.
The theatre map is the place where you can quickly review the physical location and status of key resources:
There are some other miscellaneous features also, which will be explained.
At the top of the screen are two tick boxes: 'Own air power' and 'Enemy air power'. One of these (or none) may be ticked:
When ticked, the map displays coloured representations of air power across all hexes of the map. The enemy air power maps can be especially useful when plotting fleet courses to avoid enemy air attack as much as possible. See enabling air power mappings for full information.
At the top of the screen is a toggle for enabling the 'Own Ships' list:

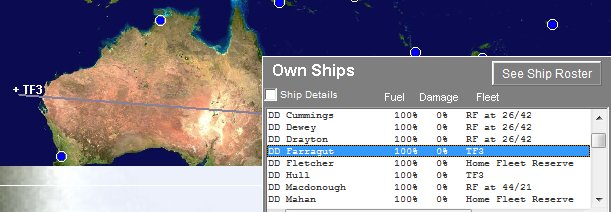
When this is ticked, you will see a list of all your ships at the bottom of the screen:
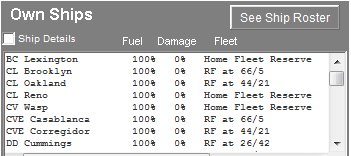
The list shows the current fuel and damage status of each ship and the fleet it is attached to. If you click on any ship, a line pointing to its current location will appear on the map:
Clicking on the same ship again will de-select the ship, and the line will disappear.
The list is scrollable. Note that the ships are grouped by category - BBs, then CAs, then CLs, then CVs and CVLs, and so on. This is an alphabetical sorting by type but it has the effect that the larger ships appear first, so you can find them more easily.
To see more detailed ship status information, tick the tick box on the upper left corner of the list:

When this is ticked, details of the currently selected ship are shown in a panel:
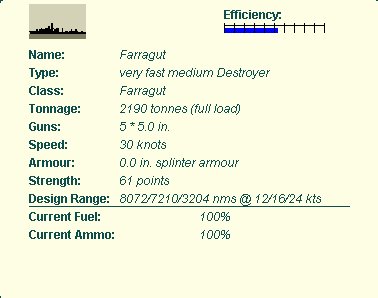
The information presented is self-explanatory, but the coloured bar at the top right labelled 'Efficiency:' needs some explanation. The bar shows the current efficiency of the ship's crew, on a 0 (left-most) to 10 (right-most) scale. The blue portion of the bar shows the efficiency that is attributable to training. If a ship has been in battle, it will have acquired a degree of battle experience as well, which will further increase its efficiency. The amount of battle-experience is shown in red. For example, a ship may have a total efficiency of 7 out of 10 - 5 atributable to training and the remaining two points to battle experience.
The training level of the crew on any ship is a function of the overall level of your fleet training, but with some random variance. See infrastructure - an overview for more information about training and how you can improve it by expenditure of resource points.
If the ship is damaged, a summary of the damage will be shown.
You can drag the panel around if you want to, eg if it is obscuring parts of the map you want to see.
Un-ticking the 'Ship details' tick box closes the panel.
If you click on the 'See Ship Roster' button on the ship list:
you will see the complete list of all of your ships in more detail:
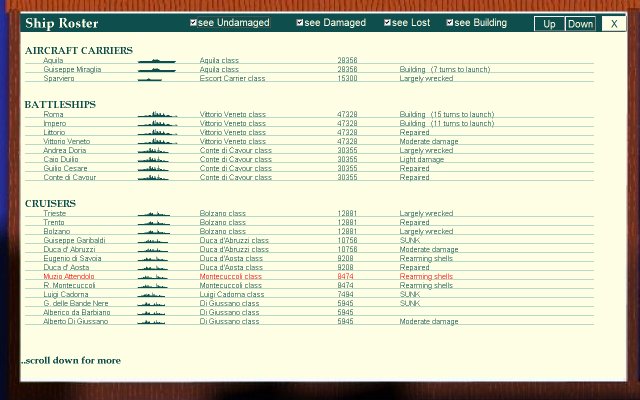
This is the same ship roster you can see as a link from you Briefing Report. (See briefing report - own ship roster for more information). Return to the map view by clicking on the 'X" button at the top-right of the ship roster; this closes the ship roster.
The locations of your own fleets are shown on the map - the name of each fleet is in white. (Enemy fleets are shown in red, orange or yellow - as explained below)
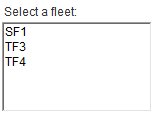
All your current active fleets are listed on the right hand side of the map:
When you select a fleet by clicking it, a pointer shows its location on the map:
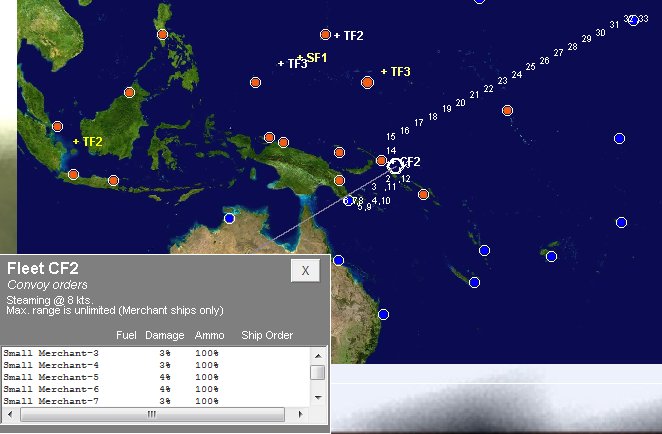
A list appears at the bottom left of the screen with summary information on the fleet: a list of all ships and information about the fleet orders. The map also shows the current movement path for the fleet as a series of hexes numbered in the order through which the fleet intends to travel.
If the 'Ship Details' box on the 'Own Ships' list is ticked, selecting a ship in the list will show details of the ship, in the same way as if you had selected the ship from the 'Own Ships' list.
De-select the fleet by clicking on it again in the fleet list at the right of the screen.
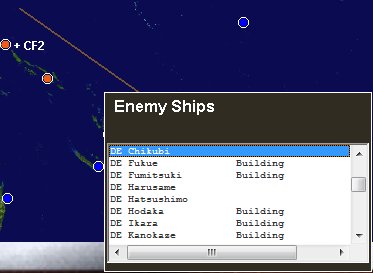
At the top of the screen is a toggle for enabling the 'Enemy Ships' list:

When this is ticked, you will see a list of all known enemy ships at the bottom of the screen:
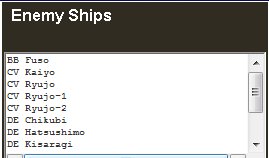
The list shows the current damage status of each ship. If you click on any ship, a line pointing to its current location will appear on the map:
Clicking on the same ship again will de-select the ship, and the line will disappear.
The list is scrollable. Note that the ships are grouped by category - BBs, then CAs, then CLs, then CVs and CVLs, and so on. This is an alphabetical sorting by type but it has the effect that the larger ships appear first, so you can find them more easily.
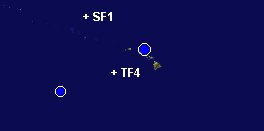
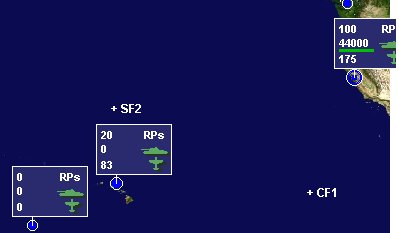
The map shows the location of every known enemy fleet:

The fleets are colour-coded to show the age of the latest report:


In the picture above, enemy fleet 'TF1' is red, fleet 'TF2' is yellow and fleet 'SF1' is pale yellow.
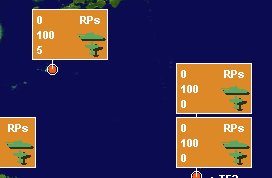
A tick box at the top of the screen allows you to view the number of resource points, troops and aircraft at each of your bases:

When it is ticked, the information is displayed like this:
The tank symbol does not denote armour as such; it simply denotes the presence of troops.
The green line under the number alongside the tank symbol indicates the surrent supply situation of the troops. If it is all green, then the troops should be fully supplied for the current turn (barring any unforeseen events). If it is all red, then the troops are completely unsupplied, and will suffer seriously from sickness and loss of morale. The amount of red indicates the degree of forecast under-supply. Use this information when planning supply missions.
More detailed information is also available. There is a tickbox at the top of the screen labelled 'Popup details?':

When this is ticked, you will see a pop up panel whenever you pass you mouse over one of your ports:

The panel displays scrollable information on the troop units and infrastructure at the port. The information is very similar to what you can see in the Briefing Report - in the Troop List and the Infrastructure List. (See briefing report - own troop list and briefing report - infrastructure list for help on reading the information.
The popup panel disappears as soon as you move your mouse away.
Note that whenever the 'Popup details?' tick box is ticked, the 'Drag' tickbox is also ticked. This allows you to drag the map around freely. (Use of the drag feature is explained below). But it also prevents any data entry if you want to use the map controls to set up fleets and missions. You will need to clear both the 'Drag' and the 'Popup details?' tickboxes before setting up fleets or missions from the map.
Similar summary (bit not detailed) information on enemy resources is available by ticking the 'Enemy Resources' tick box at the top of the screen:

Enemy resources are shown like this:
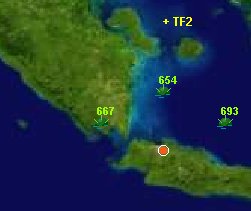
There is an 'Own mines' tickbox at the top of the screen:

When it is ticked, the map shows all your own minefields. The green numbers refer to the number of mines:
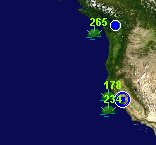
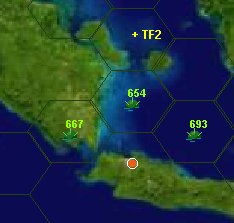
There is also an 'Enemy mines' tickbox at the top of the screen:

When it is ticked, the map shows known (or suspected) enemy minefields. The green numbers refer to the estimated number of mines:
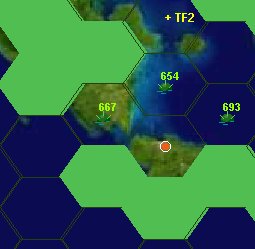
Sometimes you will want to see a section of the map in more detail. Each time you press the  button at the top of the screen, the map enlarges. Repeated pressing enlarges the view very greatly. The following picture shows a much enlarged view of part of the enemy mine fields previously shown:
Zooming out again is just as simple - click the  button at the top of the screen as many times as you want to zoom back out.
When you click the zoom in or out buttons, the 'Drag' tickbox is automatically ticked. The mouse changes to a hand. You can now click and drag the map around to see the areas you want.
To see the hex grid on the map, tick the 'Hexes' tock box at the top of the screen:

A hex grid is now displayed on the map:
Sometimes, you may want to see more clearly where the divisions are between land and sea hexes. To do this, tick the 'Land' tick box at the top of the screen:

The following picture shows the result:
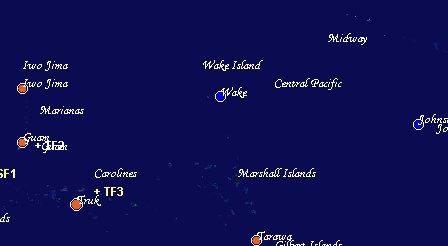
The map also has many place names on it - which are used when reports on battles and other events are generated. To see these place names, tick the 'Place names' tick box at the top of the screen

You will see place names appear: