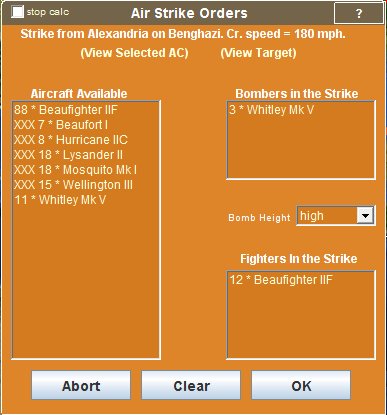
This pop up dialog box allows you to abort or amend a proposed air strike against an enemy target from one of your airfields or carriers.
The dialog points to the location of your airfield or carrier as well as to the location of the target. If either of these is currently obscured on the map by the dialog itself, you can:
It is usually best to drag the dialog around, if needed, rather than the map.
Your subordinates have calculated the best strike profile they can - the best mix of aircraft that can reach the target, deliver a sufficient attack given what is known of the target, and also defend against suspected enemy fighter strength.
Note: The fighter aircraft available for the strike will have been reduced by the number required for constant combat air patrol ('CAP'). The number of aircraft required for CAP depends on your strategy, and it is doubled by default for escort carriers and halved for airfields (which are 'unsinkable' and more easily repaired than are ships). See the help available on very cautious, cautious , aggressive and very aggressive stratgeies for more information.
Within the limits of the aircraft that are available, you are free to make any changes you want using this dialog box. You are, after all, the Supreme Naval Commander!
The available aircraft are listed on the left. The currently assigned aircraft - bombers and fighters (if any) - are listed on the right.
A short description of the strike including cruising speed is given near the top of the dialog box.

Using the controls on the dialog box you can:
You can also very easily:
To close the dialog box and continue, either abort the strike, or click the "OK" button when you are happy with the settings for the strike.
There is a 'Stop Calc' tick box at the top left of the dialog:

If you tick this, the turn calculation will stop as soon as it can after you close the dialog. This allows you to then step through the calculation progressively, hour-by-hour, following the course of any strikes you have just launched. To run the turn continuously again, simply click on the '>' button at the bottom of the screen. See running the turn for more information.
The tick box remains ticked on all future tac strike dialogs until you untick it.
Just click on the "Abort" button. This will abort the strike and the dialog box will close.
Note that if you click the "OK" button just after the strike has been cleared, this has the same effect as an abort - a strike must have at least one bomber in it.
You can freely assign to the strike any or all of the available aircraft that are suitable, and remove any that you don't want. Before changing any aircraft, you will probably want to review details of the target. See viewing target details.
To add more aircraft, select the type you want to add in the "Aircraft Available" list.
The list shows all available aircraft currently at the airfield or on the carrier. But not all aircraft are suitable for selection. An aircraft type may be unsuitable because it:
All aircraft that are unsuitable are listed in the "Aircraft Available" list but are marked as unsuitable with three crosses ("XXX"). This gives you an immediate visual clue as to the currently unsuitable aircraft types. In the illustration below, the Beaufort, Hurricane, Lysander, Mosquito and Wellington are all marked as unsuited to to the current strike:

If you click on one of the unsuitable aircraft types, you will see a message explaining the particular problem, such as shown below:

If you click on one of the suitable aircaft instead you will see a button
 and a combo box
  .
.
If the aircraft is suited to both a bomber and a fighter role there will be two buttons shown, one alongside the list of bombers in the strike, and the other alongside the list of fighters. Such aircraft, when added as fighters, will carry no bombs, so will have their maximum capability as fighters to defend the bombers in the strike from enemy fighters. But those that are added as bombers will carry the maximum bombload they can. They will be less effective against enemy fighters because their maneuverability will be reduced.
Before adding any aircraft to the strike, you can review all the details of the aircraft type - its speed, bombload, maneuverability, ruggedness and so on. See viewing aircraft details.
To add aircraft to the strike, just select the number to add in the combo box, then click the button alongside the bomber or the fighter list to move the aircraft into the strike as a bomber or a fighter. You will see the numbers in the lists change to reflect the decision just made.
Repeat this procedure as needed, for the same or other aircraft types.
To decrease the aircraft in the strike, follow a similar procedure: first, select from either the "Bombers in the Strike" or the "Fighters in the Strike" list the aircraft type whose numbers are to be reduced.
A combo box to select the number to remove, and a button to assign this number back  will appear.
Select the number and click the button. Repeat this procedure as needed, for the same or other aircraft types.
In the picture below the Whitley bomber has been selected, so that some or all of them can be removed from the strike.

Sometimes, an aircraft is unsuitable because its cruise speed is less than the cruise speed for the strike. (A strike always flies at the speed of its slowest aircraft). To bring slower aircraft into the strike, you will need to first remove all assigned aircraft, then manually assign aircraft, type by type.
The current strike cruise speed is shown in the description at the top of the dialog box.
You can remove all currently assigned aircraft just by clicking the "clear" button.
You should then add aircraft starting with the slowest ones. You can check each aircraft's cruise speed by clicking on it in the "Available Aircraft" list and watching the description at the top of the dialog box. You can also review all the details of any selected aircraft type - see view aircraft details.
Note that if you have removed all bombers from the strike, this has the same effect as clicking the "Clear" button. A strike can not proceed without any bombers.
Your subordinates have planned the strike to assign the heaviest bombloads possible for each type, in order to maximise efficiency. But the heavier the load, the less maneuverable is an aircraft, making it more vulnerable to enemy fighters.
To change the bomb load for an aircraft type, select it in the "Bombers in the Strike" list. You will then see a combo box labelled "Load"

The currently assigned bombload for all aircraft of this type in the strike is shown as selected.Note that the computer shows you only those choices that are possible given the type of aircraft and endurance required.
To change the selection, select the new load in the combo box.
The new bombload will now be carried by all aircraft of that type in the current strike.
There are up to four possible bombload choices: "Heavy", "Medium", "Light", and "Torpedo". (Choice of torpedo is only possible for aircaft that historically were equipped for them.
Note that "Heavy", "Medium", and "Light" are relative terms for the aircraft concerned. A heavy load for one aircraft, say a small light bomber, may be less than a medium or even light load for a very large bomber. The computer works out in actual weight of bombs what these settings mean, given the aircraft type.
Bombers in the strike attack in waves of related aircraft. All dive bombers will attack together. All low level bombers attack together. All torpedo bombers attack together. And the remaining bombers, which are neither dive bombers nor light bombers intended to attack only from low level, will also attack together.
This last group of bombers will drop their bombs from one of four altitudes: extremely high, very high, high or medium.
The higher the bombing height, the less accurate will be the bombing but the less susceptible to anti-aircraft fire and enemy fighters will be the bombers. So there is a trade-off.
The choice of altitude initially is set by your overriding strategy: a very cautious strategy - like the Italians had - favours extremely high altitude. As the strategy gets more aggressive, the default bombing height gets lower - making for more effective but also more risky attacks.
You can override the default setting here in this dialog box.
If any of the bombers assigned to the strike are designed for medium to very high level bombing you will see a combo box with the currently active bombing height selected. Open the combo box to see the options and change the selection if you want:
 .
.
Note: the new selection will apply to ALL future strikes, until it is changed again.
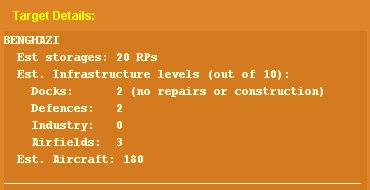
You can view details of the target at any time by moving your mouse over the text labelled "View target" towards the top of the dialog.
When you do this, you will see information on the target.
If the target is an enemy port, you will see information on:
An example is shown below:
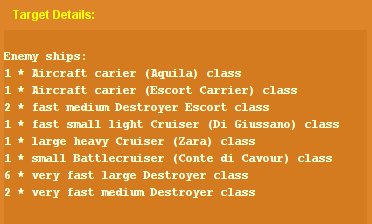
If the port has ships in harbour, OR if the strike target is not a port but an enemy fleet at sea, you will also (or instead) see details of the enemy fleet.
The number and types of ship are listed. An example is shown below:
The target information automatically disappears, and is replaced by the normal dialog information, as soon as you move the mouse away.
When an aircraft type has been selected in any of the lists (the 'Aircraft Available', 'Bombers in the Strike' or 'Fighters in the Strike' lists), you can view details of the aircraft type by passing the mouse over the text labelled "View selected AC".
You will now see information on the aircraft's:
An example is shown below:
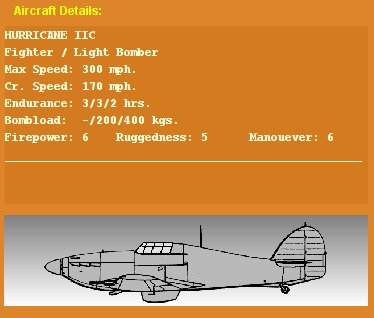
Note that the Hurricane IIc has no ASW or special capabilities, so this information is simply not listed.
The aircaft information automatically disappears, and is replaced by the normal dialog information, as soon as you move the mouse away.